Rule: Cash back
Reward every purchase with 10% credits back and a thank-you SMS
Step 1 — Pick Rule, name it 10% credits + SMS on purchase.
Step 2 — Trigger Makes a purchase. Default tiles, no conditions for the baseline.
Step 3 — Stack two actions:
- Add credits → 10% of spent amount (set Don't accumulate for these payment methods → memberCredit).
- Send SMS → thank-you template.
Step 4 — Save.
Every qualifying purchase posts 10% to the member's credit balance and sends a thank-you SMS. The memberCredit exclusion is non-negotiable — without it, balances compound on every transaction.
This playbook sets up a Rule that runs on every qualifying purchase and performs two stacked actions: it adds 10% of the purchase amount to the member's credit balance, and sends them a short SMS confirming the reward. It's one of the most common loyalty-program setups — a baseline accumulation program plus a confirmation message — and a good first Rule to build, because it exercises most of the primitives you'll meet again in other campaigns.
What you'll build
When a member makes a purchase, the platform will:
- Add credits equal to 10% of the spent amount, excluding the portion of the purchase paid with previously-earned credits.
- Send the member an SMS thanking them and confirming the reward.
Both actions run immediately, with no delay between them.
When to use this
Use this Rule when you want cash-back style accumulation, and you want every transaction to generate a member-facing touchpoint rather than sit silently in the database. It's also a good baseline to ship first and then layer variants onto — higher reward for VIP members, different copy on weekends, excluded SKUs, and so on.
If what you actually want is a discount at the register — i.e. the member pays less right now, rather than earning something back for next time — that's a Deal, not a Rule.
Before you start
2 prerequisites — SMS template + the memberCredit payment-type string
Two things to have lined up before you open the wizard:
- The thank-you SMS template you want to send already exists. Communication templates live under Comm. Templates; the preferred path in step 3 is to pick a saved template, so draft it there first. (If you'd rather use a Custom message instead, skip this — but a reusable template keeps copy consistent across campaigns and lets you revise wording in one place.)
- You know the payment-type string your POS uses for member-credit redemptions — commonly
memberCredit, but the exact value depends on what the POS sends in its submit-purchase call. You'll need it for the Don't accumulate on exclusion in step 3. Ask your integrator if you're not sure.
Walkthrough
Smart Campaigns live under Marketing → Smart campaigns in the left nav. Click Create campaign to open the four-step wizard.
Step 1 — Campaign details
Pick Rule as the campaign kind. Give it a name your team will still recognize a year from now — something like 10% credits + SMS on purchase. The description field is free-form and only appears in the list view, so a single sentence is enough.

Put the reward amount in the name itself (10%, 5%, $5 flat). When you clone this Rule later for a VIP tier or a seasonal bump, you'll be glad the number is visible in the list view.
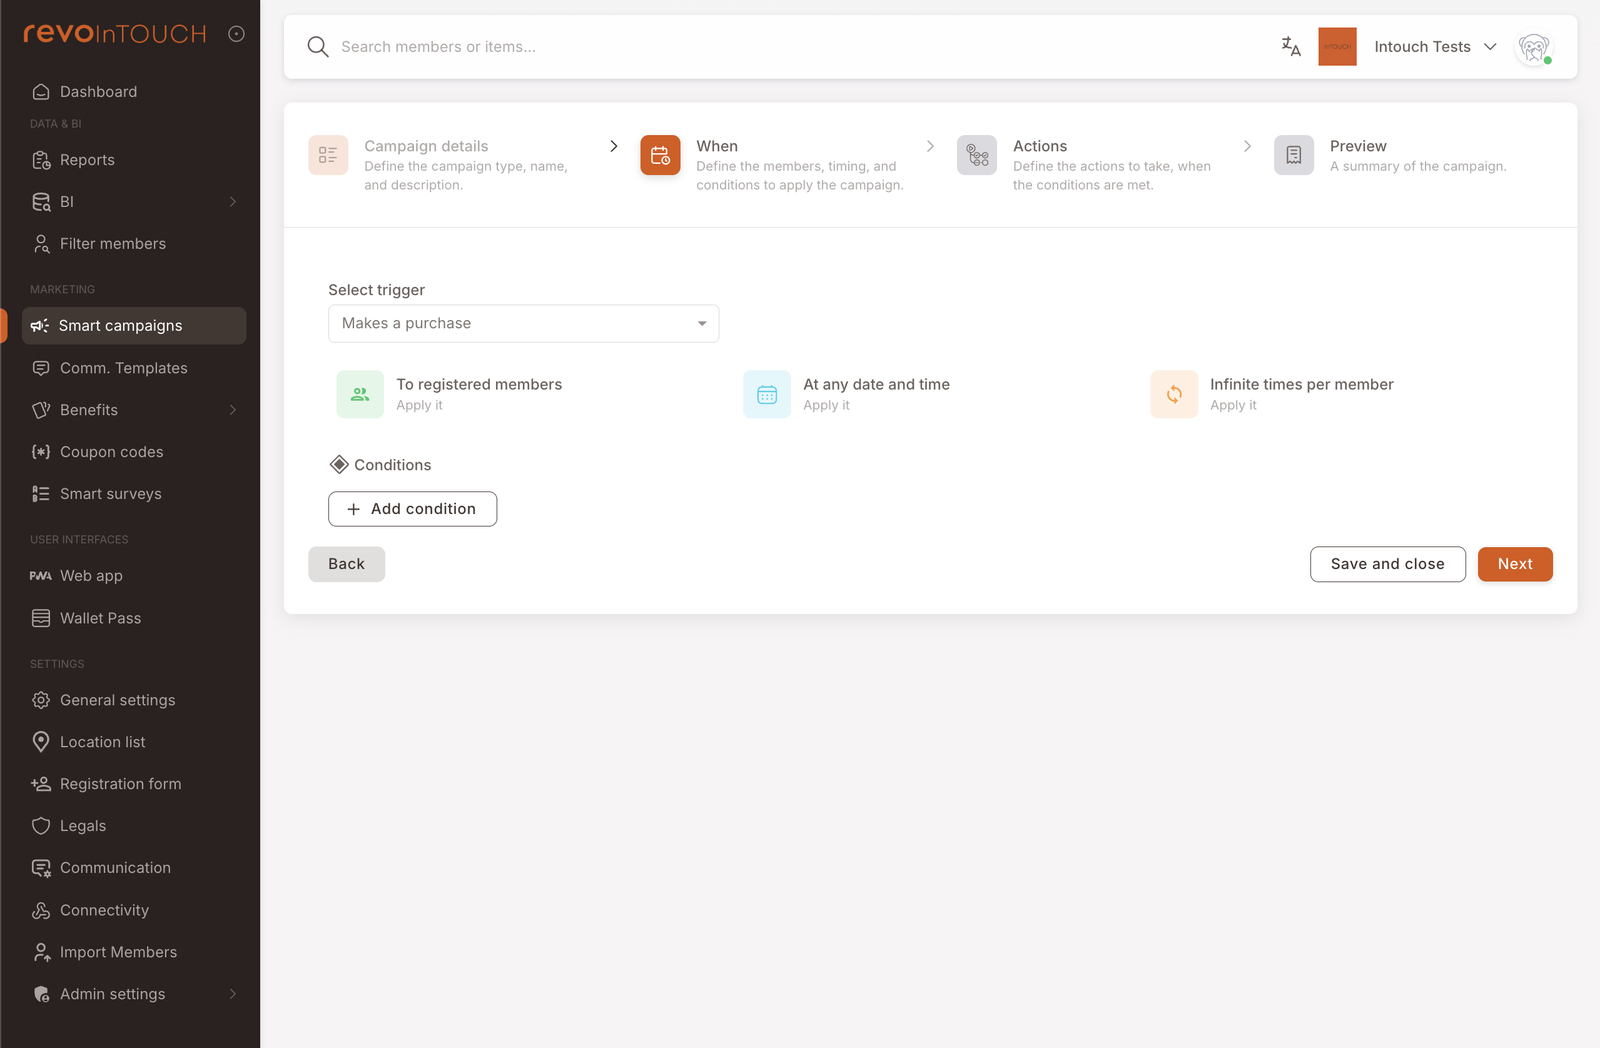
Step 2 — When
This is where a Rule earns its name — you pick the event that starts the whole flow.
Set the trigger to Makes a purchase. Leave the three default tiles as-is:
- To registered members — the reward only makes sense for people who have an account.
- At any date and time — the Rule should run whenever the store is open.
- Infinite times per member — accumulation is per-transaction, so don't cap it.
Skip the Conditions section for the baseline version. Conditions narrow which purchases qualify (e.g. basket total ≥ $20, specific branches, specific order types); add them later when you have a specific reason.
Makes a purchase exposes nine condition fields — basket items, total amount of basket, spend on specific items, branch ID, POS ID, order type, source type, source name, and payment method. See the full list on Triggers reference.
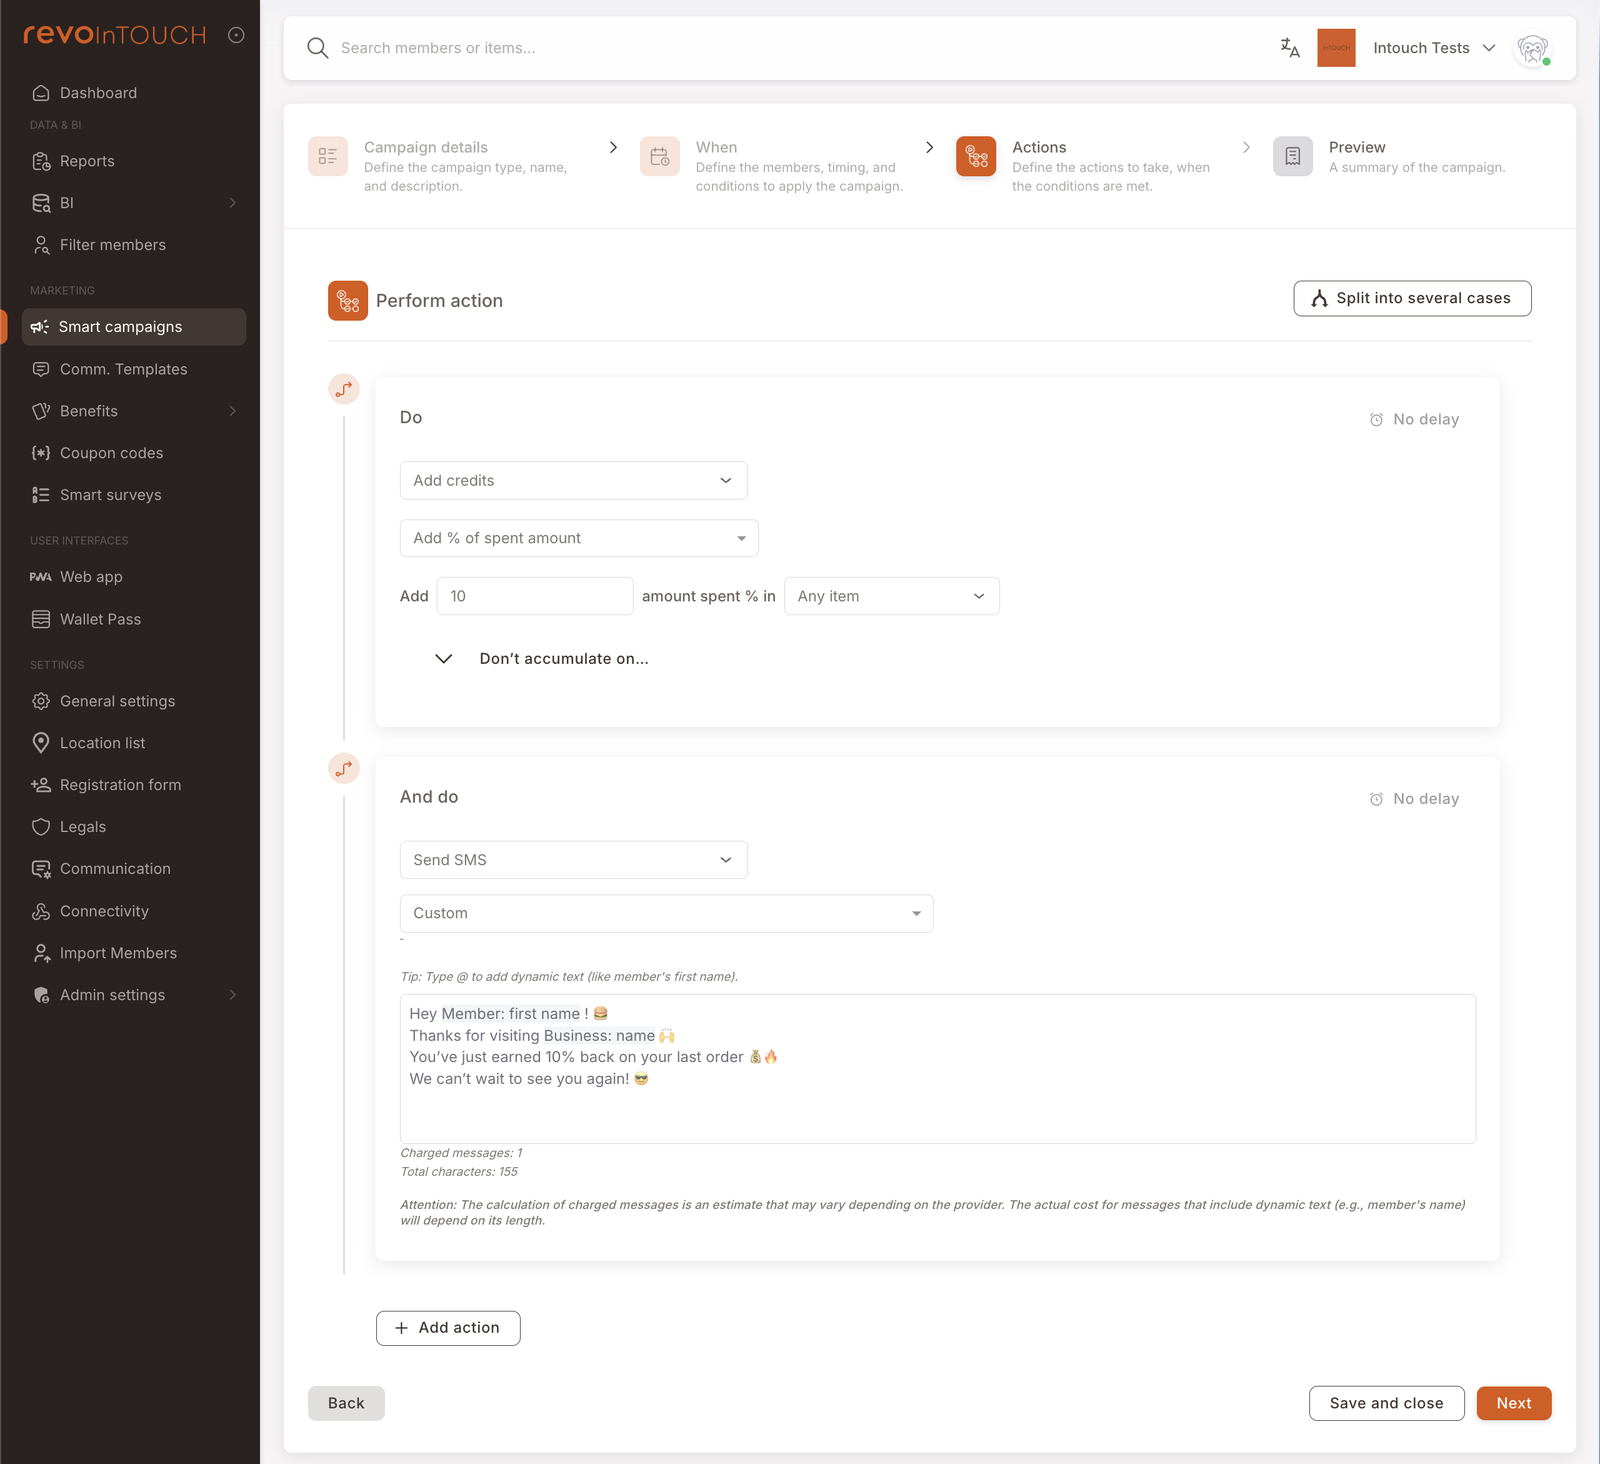
Step 3 — Actions
This is the step shown in the screenshot at the top of the page.
You're going to stack two actions in sequence using the default "Do … And do …" layout — not Split into several cases. Cases are for when the Rule should do one thing or another depending on who triggered it; stacking is for when it should do both, every time.
Action 1 — Add credits
- In the first action block, select Add credits from the action dropdown.
- Choose Add % of spent amount as the calculation method.
- Enter 10 in the amount field and leave the scope as Any item.
- Expand Don't accumulate on…. You'll see two separate exclusion controls: Don't accumulate on these items (an item picker) and Don't accumulate for these payment methods (a value field). In the payment methods field, add the payment type your POS uses for member-credit redemptions (commonly
memberCredit— check with your integrator if you're not sure). Don't skip this step. Without it, members earn cashback on the portion of a purchase they paid for with already-accumulated credits, so their balance compounds with every transaction.
Action 2 — Send SMS
-
Click + Add action at the bottom of Action 1 to open a second action block.
-
Select Send SMS as the action.
-
Pick the thank-you template you prepared under Comm. Templates. This is the preferred path — a saved template keeps copy consistent across campaigns and lets you revise wording in one place without editing every Rule that uses it.
If you don't have a template prepared and want to write a Custom message instead, switch the template source to Custom and type the body directly. Use
@to insert dynamic fields (member first name, business name, etc.) and watch the Charged messages / Total characters lines — anything over 160 characters splits into multiple SMS segments.
Leave both action blocks on No delay. The credit posts first, then the SMS fires — both within seconds of the purchase.
Dynamic fields like [first name] only resolve if the member record actually has that field populated. If you expect a lot of anonymous or partially-registered members, either write copy that reads naturally without the name ("Hey there!") or add a condition on step 2 filtering to members with a firstName on file.
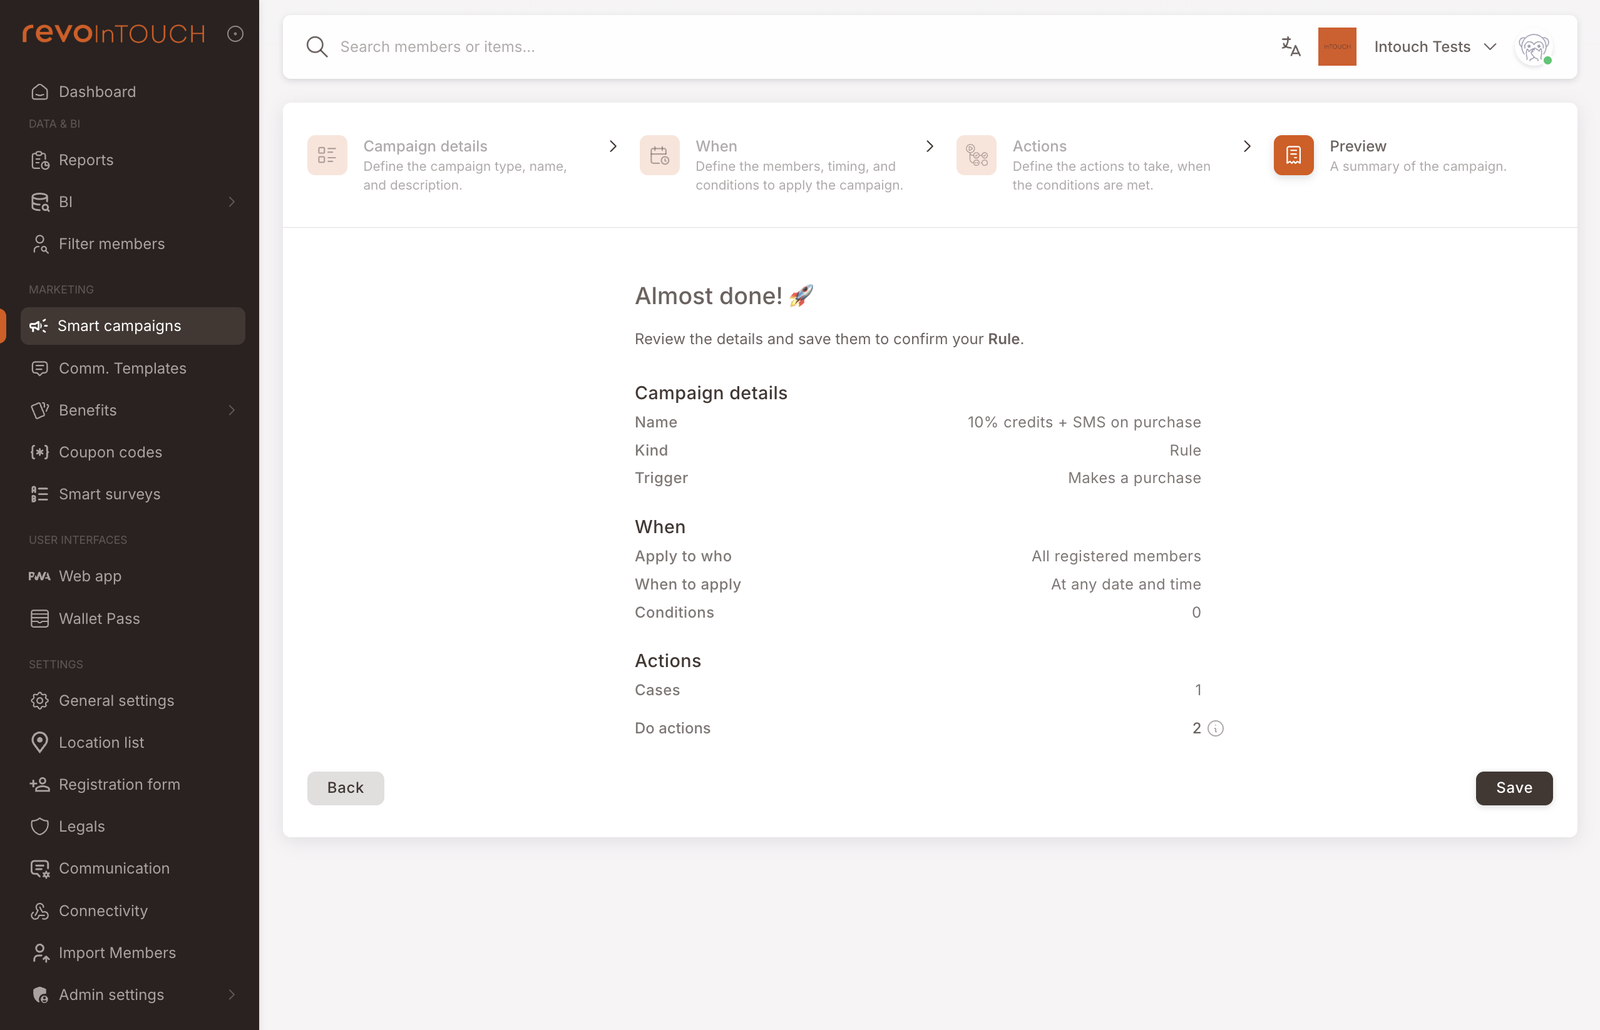
Step 4 — Preview
The final step recaps the Rule in three sections — Campaign details (name, kind, trigger), When (targeting, timing, number of conditions), and Actions (number of cases and of stacked "Do" actions).
Read the recap carefully. Do actions: 2 and Cases: 1 is what you expect for this playbook — two stacked actions inside a single implicit case. If Cases shows more than 1, you accidentally flipped into Split into several cases on step 3. If Do actions shows 1, one of your actions didn't save — go back and check.
Click Save to create the Rule. It starts life in the Smart Campaigns list as Active and begins listening for purchase events immediately — pause or flip to Draft from the list view if you need to hold it before the first live transaction.
How to test it
4-step pattern using a test-user tag and a real POS purchase
Ring the Rule in against a single test member before you let it touch the real base:
- Tag yourself (or whoever is running the test) with a
test-usertag under Members. - On step 2 of the Rule, add a condition that narrows the Rule to members with the
test-usertag. Now only the tagged member will trigger it, even if other members make purchases while the test is live. - Register the tagged member with a real phone number you control, and ring up a purchase at the POS under that member. Within a few seconds, their credit balance should increase by 10% of the order total, and the SMS should arrive.
- Once the test run confirms the credit lands and the SMS reads correctly, remove the
test-usercondition (and, if you like, the tag) and save. The Rule now applies to everyone.
Variations
4 common tweaks — VIP tier, item exclusions, weekend-only SMS, delayed SMS
Higher reward for VIP members, with tier-specific copy. On step 3, switch to Split into several cases. Each case is a self-contained action bundle — there's no way to share an action across cases — so you'll configure Add credits and Send SMS inside each case. Put a condition on tag (VIP) in the first case, set its credits to 15%, and write VIP-flavored SMS copy ("Thanks for being a VIP 🥇"). Leave the default case at 10% credits with the standard copy. The payoff is per-tier personalization that stacked actions can't give you.
Exclude promotional items on top of the member-credit exclusion. The Don't accumulate on… list can hold more than one rule. Alongside the required memberCredit payment-type exclusion, add item categories or SKUs you don't want to reward — gift cards, service charges, tips.
Send the SMS only on weekends. The cleanest way is to split into two cases: one with the condition order datetime is Sat/Sun that runs both actions, and a default case that runs only Add credits. Weekday purchases still accumulate silently; weekend purchases get the text.
Delay the SMS so it doesn't feel robotic. Open the No delay control on the Send SMS action and set it to 2–5 minutes. Credits still post instantly; the text arrives after the member has left the store.
Gotchas
2 things to watch for
- Stacked vs. split is not cleanly reversible. Toggling Split into several cases after you've configured actions wipes them. The wizard warns you, but it's easy to dismiss. Decide on the structure before you fill in the actions.
- Character budget is an estimate. Dynamic fields expand at send-time — member first names vary in length — so a message that previews at 155 characters can tip over 160 for members with long names. If you're close to the 160 boundary, shorten the template.